
Most AI agent projects that stall have a capable model and no clear job. Nobody defined what the agent should finish, how success is measured, or what happens when it gets something wrong. If you’re working out how to build an AI agent, settle those three questions before you choose a model or a framework.
The eight steps below follow that order: define the job and success metric, choose the model, design the tools, add memory and knowledge, pick a framework, set guardrails, test, then deploy with monitoring and cost control.
What an AI Agent Is: Four Parts
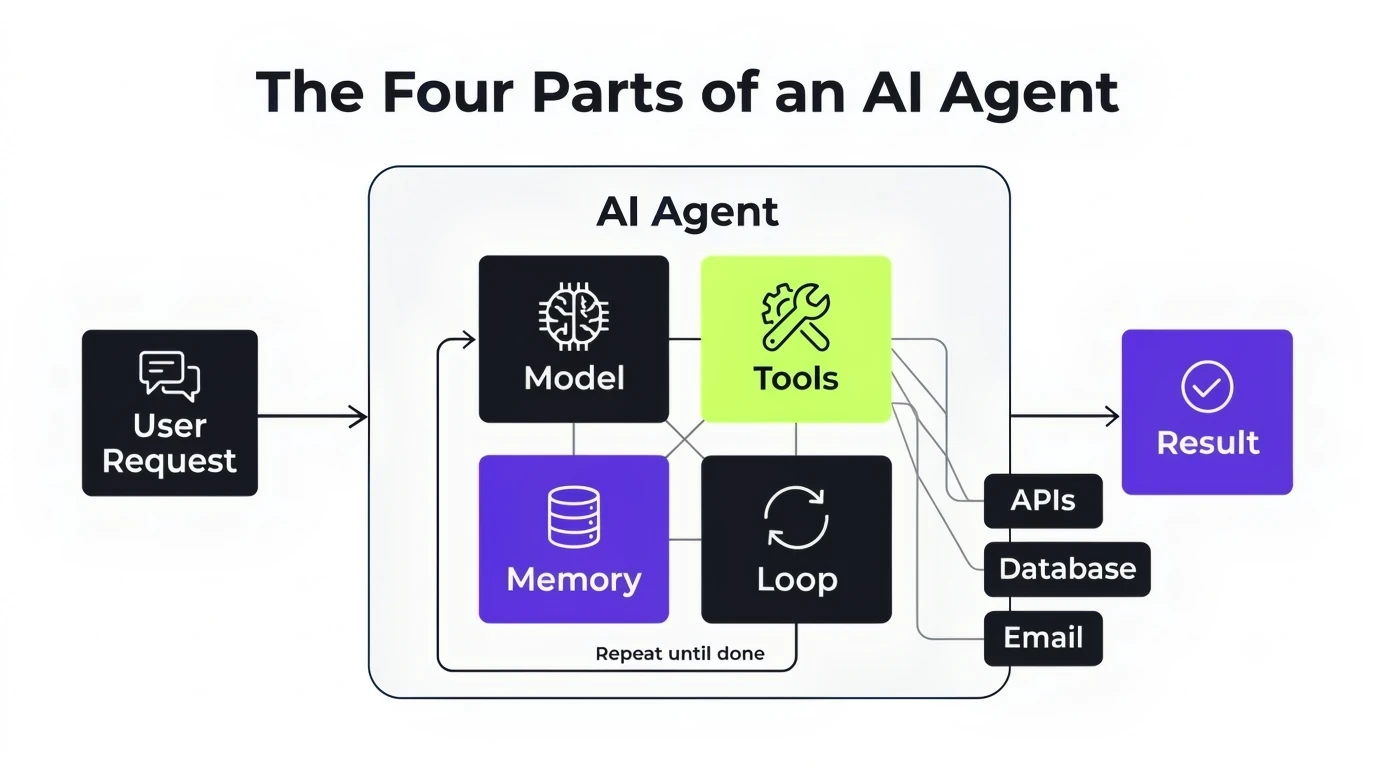
Let us start with the basics and understand what an AI agent is made of. It is a software system that uses a language model to decide what to do and uses tools to get it done. Knowing these parts makes it easier to learn how to create an AI agent for your business.
Model: The language model reads the request, reasons about it, and decides the next step.
Tools: These are the APIs and functions the agent can call, such as an order lookup or an email sender. Without tools, the agent can only talk.
Memory: Short-term memory holds the current task. Long-term memory stores facts the agent should recall later, like company policies.
Loop: The agent acts, checks the result, and repeats until the goal is met, a limit is reached, or a person needs to step in.
How the parts work together
Say a customer asks where an order is. The model decides it needs order data, calls the lookup tool, reads the result, and replies. If the tool fails, the loop lets the agent retry or pass the case to a person.
Keep in mind that the loop is what separates an agent from a chatbot.
Agent vs Workflow vs Chatbot
When making a choice between an agent, a workflow, and a chatbot, start with the task, not the technology. Before you decide how to build an AI agent, check if a simpler option can do the job.
Factor | Chatbot | Workflow automation | AI agent |
|---|---|---|---|
How it works | Answers questions in a conversation | Follows fixed steps you define | Decides its own steps using tools |
Autonomy | Low | None, rules only | High |
Cost | Low | Low to medium | Medium to high, since each task can use many model calls |
Risk | Wrong or outdated answers | Breaks when inputs change | Wrong actions that affect real systems |
Pick it when | People need quick answers from known content | Steps are the same every time | Steps change based on the situation |
You may not need an agent
Keep in mind that an agent is the most complex option, so you may not need one if:
The steps never change. A workflow is cheaper and easier to test.
You only answer questions. A chatbot that uses your help content is enough.
A wrong action is costly. Use a workflow, or keep a person in the approval step.
That’s why it is best to start with the simplest option and move to an agent only when it falls short.
Step 1: Define the Job and Success Metric
Here, the first step is to pick one narrow job for your agent. “Handle customer support” is too broad. “Answer order status questions and start returns” is clear enough to build and test. Write the job in one sentence. A focused job also keeps your AI agent architecture simple, because you need fewer tools and fewer rules.
Set a measurable target
Write down how you will know the agent works. Use numbers you can track:
Task success rate, such as 85% of order questions solved without a person
Average time to finish a task
Cost per completed task
Share of tasks handed to a person
Set hand-off rules
Decide when the agent must stop and pass the case to a person. For example:
The customer asks for a refund above a set amount
The agent is not sure about the answer
The same step fails twice
Sterling Technolabs Pro Tip: Write the success metric before any code. If you cannot measure the result, you cannot tell whether the agent improved.
Keep in mind that this step shapes every step after it. That’s why it is best to finish it before you pick a model, so that your choices match a real goal.
Step 2: Choose the Model
Now, to pick the model, focus on what your agent needs to do, not on which model is the biggest. If you are learning how to create an AI agent, remember that one agent task can call a model many times; low speed and price gaps add up.
What to check
Tool-calling reliability: The model must pick the right tool and send the right inputs. Test this first, because a wrong call can cause a wrong action.
Speed: Customer-facing agents need fast replies. Back-office agents can be slower.
Cost per task: Add up all the model calls in one task, not just one call.
Context size: The model must fit your instructions, the conversation and any documents you pass in.
Use a small and a large model together
You do not need one model for every step. It is best to send simple steps, like sorting a request, to a small model, and hard steps, like planning, to a large model. This is called routing, and it lowers cost.
Here, models change often, so check the vendor’s official docs for current names, limits, and pricing before you decide.
Step 3: Design the Tools and APIs
You can now move to the tools, which are the actions your agent can take. Good tool design matters as much as the model, because the agent can only act through the tools you give it.
Keep tools small
Build small tools that do one thing, such as “get_order_status” or “create_return”. Avoid one large tool for many tasks. Narrow tools are easier for the model to choose and easier for you to test.
Write clear schemas
Each tool needs:
A plain name and a short description of when to use it
Inputs with types and allowed values
A clear output format
Most AI agent frameworks use this same pattern, so the work carries over if you switch later.
Split read and write actions
Reading data is low risk. Writing data, such as issuing a refund, is not. Keep these as separate tools so you can apply stricter rules to the write ones.
Return useful errors
If a tool fails, return a clear message like “Order ID not found. Ask the customer to confirm it.” Return a message so that the agent can fix the problem instead of guessing.
Where MCP fits
Model Context Protocol (MCP) is a standard way to connect agents to tools and data. It is best to use it when many agents or apps need the same tools. It will not replace tool design.
Step 4: Add Memory and Knowledge (RAG)
At this stage, you decide what your agent should remember and what information it can look up. This is a key part of how to build an AI agent that gives correct answers.
Short-term and long-term memory
Short-term memory: the current task and conversation. It stays in the model’s context.
Long-term memory: facts saved for later, such as customer preferences or past cases. Store them in a database.
When to use RAG
Retrieval-augmented generation (RAG) lets the agent search your documents and use what it finds in its answer. Use it when answers depend on your own content, like policies or product guides, or when that content changes often. You do not need it if the agent only calls tools for live data.
Chunking and freshness
Split documents into small sections by topic so search returns the right part.
Remove old files and re-index when content changes, so answers stay current.
Sterling Technolabs Key Insight: Wrong answers often come from poor retrieval, not a weak model. Clean, current documents fix more than a bigger model.
Your agent can only be as correct as the knowledge you give it. That’s why it is best to review your sources before you connect them.
Step 5: Choose From the Best AI Agent Frameworks
It is best to choose from the best AI agent frameworks based on your team’s skills and the model you use, not on popularity. A framework runs the loop, tool calls, and state for you.
Framework | Best for | Languages | Strength | Limit | Lock-in |
|---|---|---|---|---|---|
LangGraph | Long-running, stateful workflows | Python, JS | Saved state, human review | You design the graph | Low |
OpenAI Agents SDK | Multi-agent apps | Python-first | Handoffs, guardrails, tracing | Tracing tied to OpenAI tools | Medium |
Claude Agent SDK | Agents that use built-in tools | Python, TypeScript | Built-in tool execution | Fewer model choices | High |
CrewAI | Role-based agent teams | Python | Crews for autonomy, Flows for control | Python only | Low |
Google ADK | Google Cloud teams | Python, Java, Go, TypeScript | Built-in evaluation | Best with Gemini | Low |
AI agent frameworks change often, so check the official docs again before you commit.
How to choose
Use these simple rules to narrow the list before you test any of them:
Need saved state and human approval steps? Start with LangGraph.
Already tied to one model provider? Use that provider’s SDK.
Want clear agent roles with little setup? Try CrewAI.
Run on Google Cloud? Look at Google ADK.
When to use no framework
Skip the framework if your agent has one model, a few tools, and a short loop. Call the model provider’s API directly and write the loop yourself. Add a framework when you need saved state, several agents, or built-in tracing. That’s why it is best to start small, so that you can add one later. You can also move faster this way, because there is less code to learn.
Step 6: Guardrails, Permissions and Human Review
To make sure your agent stays safe, add controls in your AI agent architecture before you go live. Guardrails limit what the agent can do and catch mistakes early.
Give the least access needed
Give the agent only the access its job needs. A support agent that reads orders does not need permission to edit billing.
Use a separate account for the agent, not a shared admin login.
Allow read actions by default and limit write actions.
Review the access list every few months and remove unused tools.
Add approval steps
Ask a person to approve risky actions before they run, such as refunds, deletions, or emails to customers. Set a clear limit, for example, any refund above $50.
Check inputs and outputs
Input checks: Block prompt injection, which is hidden text in a message or document that tries to change the agent’s instructions.
Output checks: Confirm the answer follows your rules and does not expose private data.
Keep audit logs
Record every tool call, input, and result. Logs help you find the cause of a mistake and show what the agent did.
Here, guardrails slow the agent down. That’s why it is best to apply the strictest checks only to actions that can cause harm, so that normal tasks stay fast.
Step 7: Evaluation and Testing
This step is where most teams save or lose the project. If you are learning how to create an AI agent that works in real use, test it on real cases.
Build a test set
Collect 50 to 100 real requests, such as past support tickets or orders. For each one, write the expected result. Add hard cases too, like missing data, angry customers, and requests the agent should refuse.
What to measure
Metric | What it tells you |
|---|---|
Task success rate | How often the agent finishes the job correctly |
Tool-call accuracy | Whether it picks the right tool with the right inputs |
Cost per task | Model and tool spend for one finished task |
Hand-off rate | How often a person has to step in |
Run tests after every change
A small prompt edit or a model update can break something that worked before. Rerun your full test set after every change, and compare the scores with the last run. Do not ship a change if the success rate drops.
That’s why it is best to set a pass mark before you test, so that you can decide quickly whether a change is safe to release.
Step 8: Deployment, Monitoring and Cost Control
Now lastly comes the launch, and this is the final part of how to build an AI agent that your business can trust. Release it slowly, watch it closely, and control what it costs.
Roll out in stages
Start with a small group of internal users.
Move to a small share of real traffic, such as 5%.
Increase traffic only when your success metrics hold.
Keep a switch that turns the agent off or sends tasks to a person.
Watch it with tracing
Use tracing to record each step the agent takes, including model calls, tool calls, and results. Set alerts for errors, slow replies, and a rising hand-off rate.
Control cost
Keep in mind that one task can trigger many model calls, so costs can grow fast. Set these limits:
Loop limit: stop the agent after a set number of steps.
Token budget: cap the tokens used per task.
Caching: reuse answers for repeated questions and fixed instructions.
Cost driver | How to reduce it |
|---|---|
Long prompts | Keep instructions short and remove unused text |
Many tool calls | Combine steps and cache repeated lookups |
Large model on every step | Route simple steps to a small model |
Long conversations | Summarize older messages |
That’s why it is best to review these numbers and your traces every week, so that you can fix problems before they cost you money or upset users.
AI Agent Architecture: Reference Design

Let us now see how all the parts fit together. A clear AI agent architecture has five layers:
Layer | What it does |
|---|---|
Interface | Receives the user request in chat or an app |
Agent loop | Plans, calls tools, and checks results |
Model | Reasons and picks the next action |
Tools and knowledge | APIs, database, and RAG search |
Controls and monitoring | Guardrails, approvals, logs, and tracing |
The layers stay the same in every project. Only the tools and rules change.
Sample project: online store support agent
Here is a sample project to show the design in use. Imagine an online retailer that wants an agent to answer order questions and start returns. The agent connects to the store’s order system through APIs, uses RAG to read the return policy, and uses a small model to sort requests and a larger model to plan. Refunds above a set amount go to a person for approval, and every step is traced.
What this example shows:
Tools stay narrow: order lookup, return start, and policy search.
The success metric is the share of order questions solved without a person.
The hand-off rule sends the case to a person when the policy is unclear.
Check out more here about our AI consulting services.
How to Build an AI Agent: Code, Low-Code or Partner
This is how you can choose your route: match it to your team skills, control and launch time.
Route | Best when | Trade-off |
|---|---|---|
Code it yourself | You have AI engineers and need full control | Longest build time |
Low-code platform | You need a simple agent fast | Less control over tools and rules |
Development partner | You lack AI skills or need a custom, secure build | Needs a clear brief and budget |
Quick decision rule
If the agent touches your core systems or customer data, and your team has not built one before, work with a partner. If the job is simple and low risk, start with low-code. You can test the idea with low-code, then rebuild in code later.
Last Words
You now know how to build an AI agent, from one clear job to a monitored launch. Your first step is simple: write the job, the success metric, and the hand-off rules for one task this week.
If you want help after that, Sterling Technolabs builds custom AI software, connects it to your existing systems through APIs, and supports it after launch. We recommend talking to our AI agent development team before you choose a framework, so that you start with the right plan.
Start small, test with real cases, add controls before you scale, and review results every week.
FAQs
What is an AI agent and how does it work?
An AI agent is software that uses a language model to decide steps, call tools, and check results until a goal is done. It keeps going without constant human instructions.
Can I build an AI agent without coding?
Yes, for simple jobs. Visual builder platforms let you upload documents, write rules in plain English, and connect tools. For custom or sensitive work, you will usually need skilled developers.
How much does it cost to build an AI agent?
Cost depends on how many systems the agent connects to, how much it can do alone, and how much testing it needs. Running costs, like model usage, continue after launch.
How long does it take to build an AI agent?
A focused agent with one job and a few tools can reach a pilot in weeks. Agents that connect many systems can often take months to test and release safely.
What is the difference between an AI agent and a chatbot?
A chatbot answers questions in a conversation. An agent also takes actions through tools, like checking an order, and decides the next step based on the result it gets back.

Send us your brief. We’ll help turn it into reality
A senior engineer replies within one business day with questions or a first plan: approach, team, timeline and estimate.
:: Keep reading


